[adinserter block=”1″]
This tutorial will teach you how to screenshot in DaVinci Resolve using various tools.
Knowing how to screenshot can help with creating thumbnails for YouTube videos and showing your style to clients.
Read on to discover the tools and methods you can use to capture a freeze frame and save it as an image file.
How To Screenshot in DaVinci Resolve – The Core Methods
Capturing a screenshot in DaVinci Resolve has a range of applications, from creating thumbnails for social media platforms to sharing specific shots.
You can add these to your media pool to use as a freeze frame, creating additional options when editing your footage with more dynamic effects.
One of the most common methods used by videographers who want to grab a screenshot from their videos is using their computer’s screen capture button while in full-screen mode.
While this is something you can accomplish in DaVinci Resolve by pressing CTRL + F to enter full screen, there are other direct processes you can use.
Let’s begin this guide by exploring how to create a still image from a video clip with the basic method used to export stills from your footage.
I’ll then move on to additional methods you can use for specific applications, such as quickly creating a freeze-frame effect for your video project.
Exporting the current frame as a still

If you want to quickly save a still of a given frame from your video clip, you can use the Export Current Frame as Still option.
A quick and easy method you can use to grab stills from your video content is to export the current frame on your video as a still.
Follow these steps to do this:
- Load up your clip and position the marker on the timeline in the edit tab.
- Head to File in the drop-down menu and scroll down to Export.
- Choose the Current Frame as Still option to save your frame in your preferred image format.
Using the Grab Still feature in the Color Tab

If you’re in the process of grading your footage and need to capture a still, you can use the Grab Still tool in the Color Tab.
Sharing screenshots from your video projects is a great way to give clients an insight into your color grading process.
DaVinci Resolve understands the importance of being able to quickly grab images via the Color tab and save them to your computer.
To grab and save stills from this section, follow these instructions:
- While on the Color page, move the marker on the timeline to the frame you wish to save.
- Right-click on the footage in the preview window and select Grab Still.
- If you want to grab a selection of stills, select the Grab All Stills option.
- From here, DaVinci Resolve gives you the option to perform the action from the first frame or the middle frame.
- You can also access missing stills in your media library by selecting the Grab Missing Stills option from the menu.
Save as a Picture via the Fusion Tab

DaVinci Resolve’s Fusion tab also has a drop-down menu you can use to quickly save a screenshot.
DaVinci Resolve’s Fusion page offers users lots of in-depth options for creating professional motion graphics and animations.
It also has a quick and easy method you can use to save an image in a few simple steps to use as you please.
Here’s how you can save a picture in your image format of choice while using the DaVinci Resolve Fusion tab:
- Get your video ready and move the marker along the timeline until you reach the frame you wish to capture.
- Right-click on the video preview window and head down to the Save Image option in the drop-down menu.
- Choose the file type and input the name you wish to use for the screen capture, then hit Save.
Using the Change Clip Speed feature
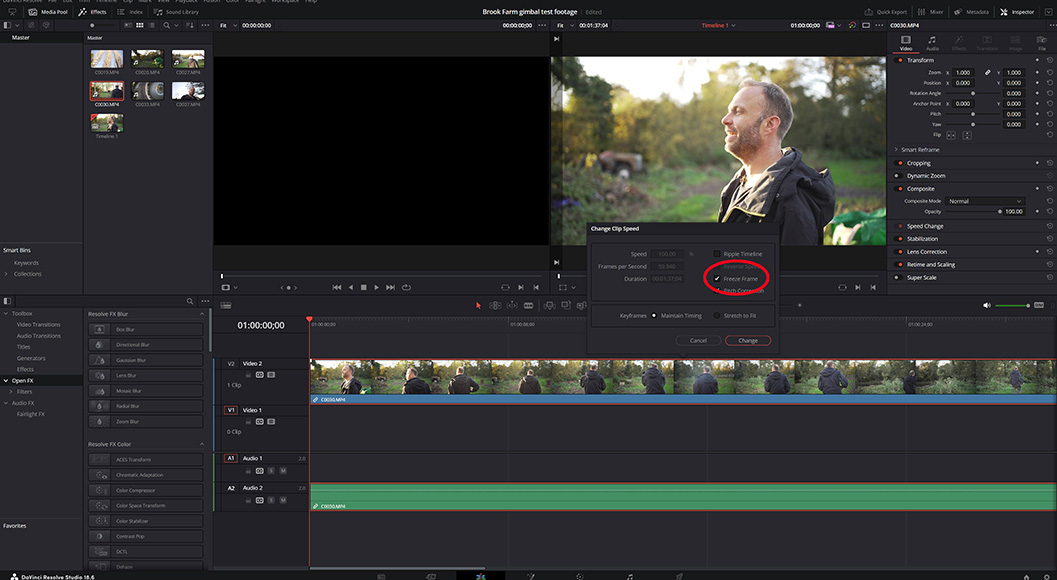
If you intend to use your screenshot as a freeze frame, you can speed up the process by using DaVinci Resolve’s freeze frame tool.
If you’re planning on using your captured image as a freeze frame, DaVinci Resolve can help you save time by using a specific tool for this task.
To create the freeze frame effect without having to save an image independently and import it back into the software, follow these simple steps:
- Load up your desired clip into DaVinci Resolve and add it to the timeline on the Edit page.
- Right-click on the video clip on the timeline and select Change Clip Speed from the drop-down menu.
- Select the Freeze Frame box in the Change Clip Speed options listed.
You can then adjust the duration of the freeze frame effect to the amount of time you wish it to last.
How Do You Screen Capture With Keyboard?
While DaVinci Resolve has several methods you can use to select a freeze frame from your media clip and export it to other formats, some prefer to use a simple screen capture.
This can be easily accomplished on all types of computers, although the process may vary depending on your computer’s brand and operating system.
For Windows users, the steps required to capture the image displayed on the screen require pressing the Windows key + Print Screen key.
This will save an image of the entire screen, so make sure you full-screen your video clip on the still frame you wish to grab.
Some keyboards, such as the Logitech MX Keys Advanced, feature a screen capture button that can be used as an instant shortcut for this process.
The steps necessary to capture a single frame from video editors on Mac computers are different and slightly more complex.
Macs have various options for taking screenshots.
To screenshot the entire screen, press Shift+Command+3.
To select a portion of the screen, press Shift+Command+4 and use the crosshair pointer to drag over the area of the screen you wish to capture with the mouse.
Once you’ve selected the area, release the mouse button or trackpad to finalize the screen capture process.
[adinserter block=”1″]
Credit : Source Post